 Do you feel the need to install Windows XP on a laptop that is not available Optical Drive like Asus EEEPC, and Dell Mini?Have you ever tried and ended with the emergence of information "INF file txtsetup.sif is missing or corrupt, status 18"? Have you tried various ways and still have not succeeded? If your experience something like that, then you need to read the following reviews.
The following guide will show you step-by-step how to use WinSetupFromUSB - one helper programs Windows XP master makers-to create a bootable USB Flashdisk master complete with Windows XP. Compared with other ways, this way is more concise and more easily done, though for beginners.
Before you begin, you need to download WinSetupFromUSB here. This program can support the installation of either Windows XP 32-bit or 64 bit.
Before you begin, you need to download WinSetupFromUSB here. This program can support the installation of either Windows XP 32-bit or 64 bit.
In addition, there are some things you need, such as:
- USB 1GB Flashdisk minimum size
- Original Windows XP CD
- The courage to try and your patience
- USB 1GB Flashdisk minimum size
- Original Windows XP CD
- The courage to try and your patience
I do not recommend you to use Windows XP that is not original or Windows XP that have been reduced so that the master CDs are smaller than the original version. I just recommend you to slipstreaming update Service Pack into WinXP. You can do it with program called nLite. Guide to use nLite you can find here.
Here are the steps you need to do:
1. Download and install WinSetupFromUSB. Default installation folder is C: \ WinSetupFromUSB.
2. Create a special folder where you save the Windows installation files. Here I save the installer file in D: \ WinXPHome. Next copy all the contents of your WindowsXP CD Installer into this folder, so it looks more or less looks like this:
3. Run WinSetupFromUSB program. Do not forget your Flashdisk plug into the USB slot. So that will appear in the USB Disk Selection are like this:
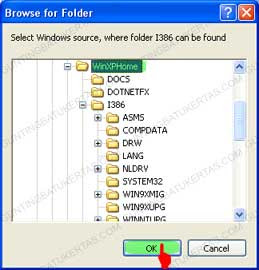
4. Select your Source folder. Click the Browse button in the line of Windows 2000/XP/2003. Discover the master folder of Windows XP that you created earlier. In this case I use the D: \ WinXPHome.
Do not forget to click OK and the folder D: \ WinXPHome will appear in the Windows 2000/XP/2003 Source column.
5. Format your USB Flashdisk. Previously I've introduced a USB tool that is for format Flashdisk HPUSBFW (HP Formatting Tool). Here, you no longer need the program, because in the existing WinSetupFromUSB program for format flashdisk programs that have been integrated.
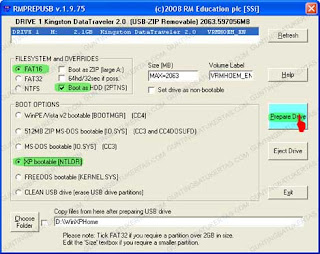
I suggest, Flashdisk sized USB up to 2GB should be formatted in FAT16. While for 4GB flash up in the form must be formatted FAT32. This time I will reformat the flash Kingstone Data Traveler mine with FAT32 by clicking the main menu RMPrepUSB in WinSetupFromUSB.
6. On the main page RMPrepUSB, you will find you pendrive under Drive column. Then select FAT16, Boot As HDD, and XP Bootable (NTLDR). Also make sure you do not select Choose Folder checkboks at the bottom. Click Prepare Drive to launch format as illustrated below:
When the confirmation came from RMPrepUSB, Click OK. Flashdisk will soon be formatted. If the information appears successful, click OK and Exit to exit the program.
7. Copy all the files in the folder Windows XP master. To begin this step, click the GO button in the main window WinSetupFromUSB program. Wait a few moments until the process is complete copy of the document. If you are still using USB 2.0, this process will not take long. If the program is used on a PC Pentium 4 with USB 1.1, the time required to copy the documents approximately 20 minutes.
If the License Agreement appears, read and click Agree. Furthermore, when you see a confirmation like this, then the circuit this process is complete.
Click OK and close the program by selecting WinSetupFromUSB EXIT button.
Next you live booting via USB. In some cases you need to press the button varies, ranging from F12, F8 until Esc. Baca Selengkapnya...


