Wednesday, March 3, 2010

How to Create Installer Flashdisk WindowsXP with Win Setup From USB

Do you feel the need to install Windows XP on a laptop that is not available Optical Drive like Asus EEEPC, and Dell Mini?Have you ever tried and ended with the emergence of information "INF file txtsetup.sif is missing or corrupt, status 18"? Have you tried various ways and still have not succeeded? If your experience something like that, then you need to read the following reviews.

The following guide will show you step-by-step how to use WinSetupFromUSB - one helper programs Windows XP master makers-to create a bootable USB Flashdisk master complete with Windows XP. Compared with other ways, this way is more concise and more easily done, though for beginners.
Before you begin, you need to download WinSetupFromUSB here. This program can support the installation of either Windows XP 32-bit or 64 bit.

In addition, there are some things you need, such as:
- USB 1GB Flashdisk minimum size
- Original Windows XP CD
- The courage to try and your patience

I do not recommend you to use Windows XP that is not original or Windows XP that have been reduced so that the master CDs are smaller than the original version. I just recommend you to slipstreaming update Service Pack into WinXP. You can do it with program called nLite. Guide to use nLite you can find here.

Here are the steps you need to do:

1. Download and install WinSetupFromUSB. Default installation folder is C: \ WinSetupFromUSB.

2. Create a special folder where you save the Windows installation files. Here I save the installer file in D: \ WinXPHome. Next copy all the contents of your WindowsXP CD Installer into this folder, so it looks more or less looks like this:

3. Run WinSetupFromUSB program. Do not forget your Flashdisk plug into the USB slot. So that will appear in the USB Disk Selection are like this:

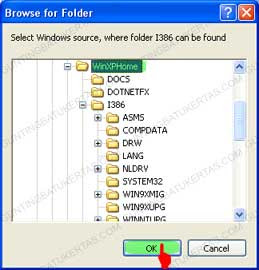
4. Select your Source folder. Click the Browse button in the line of Windows 2000/XP/2003. Discover the master folder of Windows XP that you created earlier. In this case I use the D: \ WinXPHome.

Do not forget to click OK and the folder D: \ WinXPHome will appear in the Windows 2000/XP/2003 Source column.

5. Format your USB Flashdisk. Previously I've introduced a USB tool that is for format Flashdisk HPUSBFW (HP Formatting Tool). Here, you no longer need the program, because in the existing WinSetupFromUSB program for format flashdisk programs that have been integrated.

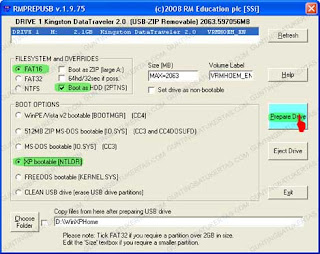
I suggest, Flashdisk sized USB up to 2GB should be formatted in FAT16. While for 4GB flash up in the form must be formatted FAT32. This time I will reformat the flash Kingstone Data Traveler mine with FAT32 by clicking the main menu RMPrepUSB in WinSetupFromUSB.

6. On the main page RMPrepUSB, you will find you pendrive under Drive column. Then select FAT16, Boot As HDD, and XP Bootable (NTLDR). Also make sure you do not select Choose Folder checkboks at the bottom. Click Prepare Drive to launch format as illustrated below:

When the confirmation came from RMPrepUSB, Click OK. Flashdisk will soon be formatted. If the information appears successful, click OK and Exit to exit the program.

7. Copy all the files in the folder Windows XP master. To begin this step, click the GO button in the main window WinSetupFromUSB program. Wait a few moments until the process is complete copy of the document. If you are still using USB 2.0, this process will not take long. If the program is used on a PC Pentium 4 with USB 1.1, the time required to copy the documents approximately 20 minutes.

If the License Agreement appears, read and click Agree. Furthermore, when you see a confirmation like this, then the circuit this process is complete.

Click OK and close the program by selecting WinSetupFromUSB EXIT button.

Next you live booting via USB. In some cases you need to press the button varies, ranging from F12, F8 until Esc. Baca Selengkapnya...

Sunday, January 17, 2010

Thursday, December 3, 2009

What is FaceBook Unblock?

For frequent users of social networking sites, finding a FaceBook unblock services can be truly valuable. The growth of the internet has lead many companies and schools to install internet filtering software that can prevent many web surfers from gaining access to desired websites.

Social Networking Sites

One of the most popular types of internet sites that have exploded over the internet over the past several years is social networking sites. These sites were first introduced in the mid-1990s and expanded with the introduction of Friendster in 2002 and then within the next few years when MySpace was introduced in 2005. In 2006, FaceBook was introduced as a competitor to MySpace and today it is one of the top ranked social networking companies on the internet today.As membership in social networking sites and internet messaging has grown, more and more companies have installed internet filtering software as a means of controlling web surfing activities and protecting valuable computer networking equipment and work stations.

Filtering Software

As the internet has grown, more and more companies, schools and public computer network administrators have installed filtering software on these computer work stations. The reasons for concerns about the use of internet connected work stations are valid and important to understand.

One of the primary concerns about web surfing is that it can leave work stations and computer networks vulnerable to malware, spyware and computer viruses. These malicious software infections can not only affect the work station that unknowingly downloaded the infection, but the entire computer network. As a result, important and valuable files can be destroyed or corrupted. Efforts to clean the entire system do not only involve cleaning the work station where the infection originally occurred, but also the network server and every work station to which the infection spread.

The other concern that both schools and workplace administrators have is the amount of time wasted by accessing websites that are not related to classroom assignments or work. A recent study found that individuals can waste hours at a time without even realizing it as they surf from website to website following items of interest to them. And social networking sites like FaceBook, MySpace and Twitter fall within the category of time wasting activities for concerned workplace and school administrators, who have a vested interest in keeping computer uses focused on the work at hand.

FaceBook Unblocking

While users of social networking sites may find themselves frustrated at looking at a “blocked website” message on their computer screen, there are ways to bypass filtering software. Proxy services are the way to work around filtering software. Proxy services work by allowing members to sign up for a membership that provides access to a proxy server. The proxy server site is not recognized as a dangerous or malicious website and is not blocked. Once logged on, members can anonymously go to their desired website without being tracked. And good proxy services prevent hacking by encrypting both incoming and outgoing activities as long as the user is signed on to the proxy server.
Baca Selengkapnya...

Steps to stay safe on the internet

1. Be careful when downloading

At the time of discharge must be careful to download malicius software. There areany many sites on the Internet to download movies and songs in which most sites have spyware and viruses goods instead of songs and movies. So download the software once confidence in the business.

2. Protect your self from dangerous emails

E-mail has become one of the most common means of sending information from one person to another on the internet. But there are many scams on the internet, running with avrerage e-mail. Emails from an anonymous person who does not know can contain viruses and spyware as the attachment, both to keep you safe from all types of threats such as email, payment of interest to them and the use of exploration in the mail.

3. Do not give personal information online

It also recommends that you do not give any personal information online, including name and address. Read the intsructions carefully before any making agreement. Do not fill in application forms from strangers.

Emma is a specialist in online virus removal for iYogi, a leading IT support based in India, iYogi provides computer support via phoneand remote access for home users and small businesses worlwide. Live 24 /7 support coverage extends to technologies that we use every day.

iYogi is the first direct-to-consumer and service support control of the virus in india. Provide an annual unlimited subscription to technical support, iYogi now boasts more than 50,000 costumers. The company employs 600 professional services to customers in yhe U.S., UK, Canada, Australia and Singapore. Backed by Canaan Partners, Silicon Valley Bank and SAP Ventures, the company has been featured on MSNBC, ZDnet, Yahoo Finance on eWeek. It has also been declared winner of the "Red Herring 100, a selection of the 100 most innovative private technology companies based in Asia.

Author : Nick Gray
Baca Selengkapnya...

Tuesday, December 1, 2009

Mari Bertukar Link

Sahabat-sahabat blogger, saya mengajak para sahabat untuk bertukar link, selain untuk mempererat hubungan sesama blogger juga bermanfaat untuk meningkatkan traffic atau pagerank.
Silahkan pasang link blog saya di bawah ini :


Jika sudah terpasang,silahkan beritahu via kotak komentar dan selanjutnya saya akan menambahkan link blog sahabat di Daftar Link di halaman ini,terima kasih.


Baca Selengkapnya...

Saturday, November 28, 2009

Mau Dapat $100 Langsung Dari Paypal??

Paypal lagi bagi-bagi duit secara instant, cukup mendaftar program Paypal Wishlist via Facebook (punya FB kan?), mekanismenya adalah harus mengijinkan aplikasi Paypal Wishlist ini kedalam account FB rekan.

Persyaratan umum untuk ikuti program ini:

1. Punya account Facebook.
2. Punya account Paypal yang sudah terverifikasi, belum punya Paypal?
Daftar disini , dan kalau mau beli VCC untuk verifikasi disini
3. Usia minimal 18 tahun.

Ini step-stepnya:
1. Login ke account Facebook
2. Lalu klik Link ini (link referral saya hehehe:D) untuk allow aplikasi Paypalnya kemudian akan masuk ke halaman Wishlist.
3. Nah di sini, masukin email Paypal kalian (tentunya yang sudah terverifikasi jika belum coba beli VCC atau gunakan credit card).


4. Setelah itu pilih items yang anda inginkan untuk di masukan ke dalam Wishlist, ini tugasnya, kamu cuma klik2 5 kali maka beres! Dan dapet $1
5. Kemudian lihat button bagian kanan tempat masukin email ada pemberitahuan bahwa kita telah dapat $1


FAQ:

1. San katanya dapet $100 kok cuma $1 sih?!! Maksudnya $100 adalah maksimal pendapatan yang rekan terima dari program ini.
2. Lalu gimana biar dapet $100 San? Cukup menyebarkan tentang program ini ke semua teman dan ajak mereka untuk mendaftar via referral link kamu, seperti yang saya lakukan di posting ini, dari tiap pendaftar anda dapet $1.
3. Cara dapetin referral linknya gimana? Gini bro, ini bentuk umum dari referral link Paypal WishList:

http://apps.facebook.com/paypalwishlist/?ppref=User_ID_Facebook_Anda&ref=mf

Note: Yang di bold yang harus di ganti dengan user ID Facebook kamu.
4. Lalu gimana menemukan user id Facebook San? Kamu ke profile Facebook, kemudian view source (Klik kanan-> View Source) dan cari “User” (tanpa tanda petik) akan menemukan kode seperti ini;

Env={user:1221597230,method:”GET”

Tuh dia yang di bold yang kamu musti masukin ke link referral tadi jadinya begini:

http://apps.facebook.com/paypalwishlist/?ppref=1221597230&ref=mf

Gampang kan? Lalu undang siapapun tuk daftar ke program ini dengan link referral anda.
5. Lalu apalagi? Yahhh.. apalagi selain Mendaftar

Tambahan: Seluruh uang yang anda peroleh dari program Paypal Wishlist ini akan di transfer ke account Paypal anda selambatnya tanggal 28 Febuari 2010, dan satu lagi pastikan pada bulan tersebut anda login ke acc Paypal paling tidak sekali untuk verifikasi jika tidak earning anda akan dibatalkan.
Baca Selengkapnya...

Cara Mendaftar dan Verikasi Paypal

Bagi pebisnis online, tentu istilah Paypal sudah tidak asing lagi. Sedangkan bagi yang belum, perlu saya jelaskan di sini bahwa PayPal adalah sarana yang disediakan untuk transfer uang via internet.

Banyak toko-toko online yang menerima pembayaran via PayPal. Selain itu Paypal juga banyak digunakan untuk pembayaran komisi penghasilan dari bisnis online,Nah… bagi Anda yang berniat ingin membangun bisnis dari internet, maka sudah seharusnyalah Anda memiliki akun di Paypal. Dengan Paypal Anda dapat mengirim atau menerima uang ke/dari siapapun dan dimanapun berada tanpa terkecuali di seluruh dunia.Pada prinsipnya, Paypal juga mirip dengan rekening bank. Ketika kita mendaftar akun di Paypal, kita akan diberikan nama rekening (bukan nomor rekening seperti bank). Nama rekening ini adalah berupa alamat email kita, mengingat tidak satupun alamat email yang sama didunia ini yang sama, meskipun pemiliknya orang yang sama.

Lantas.. mungkin Anda berpikir, bagaimana cara mengambil uang yang ada di rekening Paypal kita? Apakah Paypal menyediakan ATM? He… 3x… Tidak kawan, Paypal tidak menyediakan ATM. So… gimana cara mengambilnya? Untuk mengambil uang dari akun kita di Paypal, kita terlebih dahulu harus transfer ke rekening bank kita. Proses ini istilahnya adalah ‘Withdraw’. Nah… barulah uang bisa diambil. So.. apabila Anda sudah memiliki akun Paypal, hendaknya Anda juga punya rekening bank di Indonesia. Terserah banknya apapun bisa.

Dari penjelasan di atas, mungkin Anda berpikir ngapain harus pakai Paypal, kan langsung bisa transfer uang dari bisnis online via bank? He… 3x… bagaimana seandainya yang mengirim uang kepada Anda adalah orang dari Amerika atau Inggris? Padahal Anda hanya memiliki rekening di bank BNI, misalnya. Tentu hal ini membuat repot dalam proses transfer uangnya. Nah… di sinilah peran Paypal.

OK saya kira sedikit penjelasan di atas bisa memahamkan Anda tentang Paypal. Nah.. berikut ini akan dijelaskan bagaimana cara mendaftar akun Paypal. Ini dia langkah-langkah pendaftarannya:

1. Silahkan buka situs Paypal

2. Klik link SIGN UP

3. Pilih Negara Anda, dalam hal ini Indonesia.

4. Selanjutnya kita akan dihadapkan pilihan tipe akun yang bisa dipilih. Dalam hal ini, silakan pilih PREMIER (PRIMER). Dengan tipe ini, Anda bisa mengirim dan menerima uang. Sedangkan tipe PERSONAL hanya bisa mengirim saja, tapi tidak bisa menerima uang.

5. Selanjutnya, isilah data pribadi Anda pada form yang disediakan. Isikan data sekurat mungkin. Jangan lupa masukkan nama email Anda. Email harus valid, karena akan digunakan sebagai nama rekening Anda.

6.Setelah Anda memasukkan data diri dengan lengkap, maka sebenarnya akun Anda sudah siap. Namun belum aktif (verified). Nah… untuk mengaktifkan akun Anda harus memasukkan data kartu kredit Anda. So… bagaimana donk bila kita tidak punya kartu kredit? Don’t worry… ada jasa pembelian kartu kredit virtual (virtual credit card – vcc) khusus untuk mengaktifkan akun Paypal. Salah satunya adalah VCC-Indonesia Mengapa saya sangat merekomendasikan pembelian VCC di VCC-Indonesia? Berikut ini alasannya:

Aman. Proses pembelian VCC melalui VCC-Indonesia adalah aman dan tidak ada unsur penipuan sama sekali. Dan produknya adalah suatu yang legal dan memiliki hak cipta Terpercaya. Anda dapat mempercayai VCC-Indonesia karena Salah satu ciri penipuan di internet adalah nama si pemilik situs adalah hidden (tidak jelas) dan iming-iming harga yang jauh lebih murah.

Proses cepat dan mudah. Proses pembelian VCC dan verifikasi Paypal nya sangat cepat (hanya dalam 10 menit atau kurang) dan mudah, semudah berhitung 1, 2, 3…

Layanan support. Layanan support 24 jam bila Anda kesulitan dalam proses verifikasi akun Paypal dan senantiasa memberikan petunjuk langkah-langkah verifikasi bila Anda perlukan. Terjamin. VCC yang Anda beli melalui VCC-Indonesia dilindungi oleh hak cipta oleh yang bersangkutan. Sehingga tidak usah takut bila produk ini disalahgunakan oleh orang atau pihak lain. Oya satu lagi… jangan mudah percaya dengan program serupa yang menawarkan jasa pembelian VCC dengan harga yang sangat murah. Mahal dan murahnya suatu produk tergantung dengan kualitas produk dan kualitas layanan serta supportnya. Memang di VCC-Indonesia agak sedikit mahal dibandingkan program serupa yang lain yang banyak bertebaran di Indonesia. Namun… mahalnya suatu produk pasti diimbangi dengan kualitasnya.

Nah… setelah Anda membeli VCC di VCC-Indonesia, Anda akan diberikan nomor kredit kredit serta 3 digit kode verifikasi. Tugas Anda berikutnya adalah memasukkan nomor kredit dan kode verifikasi ke akun Paypal Anda. Caranya adalah masuklah ke akun Anda melalui proses login. Apabila akun Anda belum aktif, setelah login Anda langsung dihadapkan pada form untuk memasukkan nomor kredit dan kode verifikasi.

Tunggu beberapa saat, dan akun Anda akan aktif atau verified. Andapun kini bisa menerima dan mengirim pembayaran ke seluruh dunia dengan aman dan cepat.

Klik Banner ini untuk memesan VCC Solusi Verifikasi PayPal Dengan VCC Indonesia
Baca Selengkapnya...

Previous